Sunday, November 28, 2010
More content to come
I picked myself up a camera and a new hard drive, so there will be more content coming soon. Props, reviews, and gaming stuffs.
Saturday, November 20, 2010
Shield and Shoulder Progress
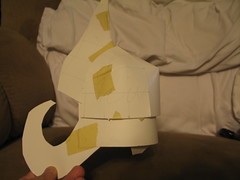
Ended up scrapping the first draft of the shoulder. Im not experienced enough with expanding foam to make anything that doesnt look awful. Instead we have this posterboard tape together thing. I am definitely on the right track with this, just need to make it a bit bigger and get the rifts in the central lobe open. I think I am going to try wonderflex for this piece when I am satisfied with the mock up. It is currently too small and flimsy with little to no detail. The "ribbon" will be added later most likely out of a seperate piece of wonderflex wrapped around like cloth.

(also pictured RumKitty's clanrat casualties left over from our inagural Island of Blood game. When I get a few more games under my belt Ill post some opinions on it. Im relitively sure cosplay readers arent going to care about warhammer but I want to get started painting again. In short: What the hell was GW thinking putting a 410+ beast of a general in a starter? It pretty much soloed RK's army.)
I am really happy with the progress I am making on these two pieces. I am almost stumped on the mace, I have little to no idea what I need to do with it. In other news my guild dissolved and I picked up new hammer for my paladin and am one achivement short of getting my frost-drake.
Edit: 100 views for my blog (with myself turned off) If any of you actually read this feel free to leave comments about what you might want to see more of. Also if you're bored click through some of the ads, I get paid from them and that money is just going to go straight into more costumes. Thanks for getting me to the 3 digit mark, and for sticking around on the long climb to 1000!
Monday, November 15, 2010
Shield teaser

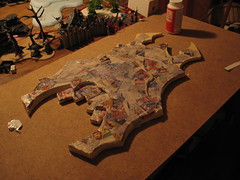
Here is first draft of the Bulwark of Smoldering Steel, the shield to accompany my paladin's sanctified lightsworn garb. This will be the very base layer, with about 4-5 more layers on top for the detailing. The entire thing is 27"x21" and will weigh probably about 10lbs or less. I have to be able to carry it one handed without straining. If everything goes well I also want to be able to attach it to my back like it works in game. I also would love to have it lit for it to be more impressive.
I can't say I am fully happy with how it turned out. I made a few mistakes but since foamcore is so cheap I can afford to mess up a few. I really wish I could find pregridded things, thats always something I have had problems with when transposing a reference image.
EDIT: I know the skull is too small. That will be fixed.
Edit2: Got the shield cut out this morning and just about passed out, too sleepy to get anything done. Also scrapping the first piece of the expanding foamed armour. Ill come back and make a better form, thats the big thing I didnt do.
Friday, November 12, 2010
Quick Post
Girlfriend is up for the weekend, so there is a good chance I can get her help. Look forward for lots more pics coming soon.
Tuesday, November 9, 2010
Pally work PHOTOFLOOD
WThis post will be updated all day. Let me start off saying that I took a trip out to Michaels today with a huge coupon and walked out with close to $50 in stuff for less than $20! Here was what I walked out with:
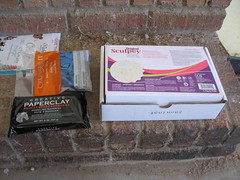 Thats a $30 box of sculpey (3 rolls of it, rolls usually going around $10), a small bag of paperclay (which Ive been wanting to try out ever since I heard of it), and some bloons. NOT PICTURED: clearance candy that I ate on the way home.
I have been saying I wanted to show my thought process. well here are a few images to show kinda what goes on in my planning:

My last image for now is a mockup of how the piece will fit on my shoulder. I feel like it looks too small. I know it will be much bulkier when its filled and such, but until then Im just going to have to worry about it. The best part of working with cardboard is definitely not getting attached to the pieces, I am working with the thought in mind that I will most likely ruin a few pieces before I get one worth anything. This is something I want to work on with myself, because I tend to get frustrated when things don't go exactly as I planned them. Ill often just give up on projects that stump me like that (see: laharl, lightning, dragoon). I have rambled long enough, here is the pic.

Note: this post will be updated as much as I can today.
Update: feel like awful, taking a quick nap.
Final update: I slept too long. I got a few more slats cut out. Id like to get a skeleton build for each side, then get the lobe into place with its backing (basically taking a concave orb on the outside, then with a convex one on the inside to keep it closed up. That way ill have a little place to run in wires to light this sucker up. I feel a little better about the size. Id get the last few images up but my camera shit out and Im too lazy to go get another battery for it. That will just have to wait until tomorrow.
Monday, November 8, 2010
Pally ref pics
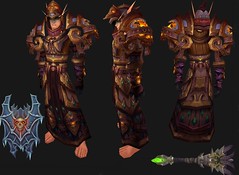
Click for bigger, I put the Lightsworn Garb on in the Wowhead.com model and just capped the pics. Overall my first project will be the mace and shield. Then the shoulders and other armour. I also plan to leave the helm for last (seeing as I have NO idea how to do it) and possibly leave the chest off (just make my bloodknight tabard). I could make another set of weapons for prot and ret, but that will come later. I realize he isnt wearing shoes... Ill fix that.
Late edit:
I HAVE CREATED
A BRICK. Having some second thoughts about how this is going, I dunno if the scale is right, ill take some looks back at my plans and see, maybe its just that the skulls are so bulky.
Trauma update

Ok, I wanted to give a rundown of what I managed to get done today. Think I may be getting sick so I didnt get as much done as I had wanted. Anyway, lets get into it.
I decided the head of the mace itself is about 3"x6"x3". I set to cutting it out of expanded polystyrene with a sharp knife. Cutting foam neatly requires either a foam cutter (hot wire) or a very sharp knife. I ended up missing about 1/2" on the inside, so I cut strips of foamcore to size. I then set to gluing the whole thing together. I then pinned it together using regular sewing needles and set it to dry with a weight on top.
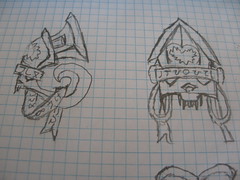
I had hoped to get more done today but I have to wait for the glue until later. I probably will try to get more done tomorrow. Also I plan to start uploading sketches to show the process of how I visualize a piece.
The next step on this piece will be to put a facing of foamcore over the faces of the mace to accomplish 2 things: to give it a bit more bulk, and to cover any lines from the foam. Expanded styrene is so nice to work with, but this shortcut has some practical applications. I can sink a hole into the styrene and mount the battery and needed electronics in it out of sight of someone looking at the piece.
Edit: (8:35pm)
Attached the facts and sunk the battery compartment into the foam. It will be hidden under the cap of the mace. I still need to get ref pics and some sketches scanned. I hope to get a reference collage together tonight at least.
Some minor updates and today's schedule
I added a flickr feed over there to the right, also I plan to add tags to ease looking through this thing.
My plans for today (at least as it relates to this blog and my projects) are to head out shopping for some sculpy clay, a pvc tub, some hardware, and possibly some wiring and leds for lighting this mace. The plan for today is to get the base of the mace done. The mace is trauma/lockjaw, the tier 10 healer mace. Below is a reference shot (pic lifted from wowhead).
 My idea is to divide the mace into 3 pieces. The base, the haft, and the head. The head is then subdivided into the submace, mace, and skulls sections. The whole piece will be based off a piece of pvc pipe, seeing that I will be able to run wires through it. The base will be sculpted from Sculpy and have a lit resin gem in it. The haft will be wrapped in purple ribbon and have the details built up with clay and paper mache. The submace will again be sculpted. The mace itself will be a foam block covered in foamcore. There will be a little hole cut for the battery and electronics to go, this will be hidden by the top piece which I plan to attach with a screw or something. If I get a scanner together ill upload some sketches to show how I like to visualize things before I set into making them.
When I get my materials together, Ill post a quick rundown of all my tools and materials to give some ideas of what I work with.
My plans for today (at least as it relates to this blog and my projects) are to head out shopping for some sculpy clay, a pvc tub, some hardware, and possibly some wiring and leds for lighting this mace. The plan for today is to get the base of the mace done. The mace is trauma/lockjaw, the tier 10 healer mace. Below is a reference shot (pic lifted from wowhead).
My idea is to divide the mace into 3 pieces. The base, the haft, and the head. The head is then subdivided into the submace, mace, and skulls sections. The whole piece will be based off a piece of pvc pipe, seeing that I will be able to run wires through it. The base will be sculpted from Sculpy and have a lit resin gem in it. The haft will be wrapped in purple ribbon and have the details built up with clay and paper mache. The submace will again be sculpted. The mace itself will be a foam block covered in foamcore. There will be a little hole cut for the battery and electronics to go, this will be hidden by the top piece which I plan to attach with a screw or something. If I get a scanner together ill upload some sketches to show how I like to visualize things before I set into making them. When I get my materials together, Ill post a quick rundown of all my tools and materials to give some ideas of what I work with.
FIRST POST.
Hello all, I am t3hRogg, also sometimes Ross. Ill be posting in this blog work in progress and completed shots of my work. I make prop weapons, armour and wargames terrain. I will discuss commission work but am not fully open for business quite yet. I hope to get as much uploaded to this site as possible. Thank you all who read this.
Samples of my work can be found here. However take a look at my newer pictures here, and Ill show I have learned alot and my techiniques are improving (hopefully).
Samples of my work can be found here. However take a look at my newer pictures here, and Ill show I have learned alot and my techiniques are improving (hopefully).
Subscribe to:
Posts (Atom)